Some links on this page are affiliate links. If you sign up through one, Build & Beyond may earn a commission at no extra cost to you. The walkthrough is educational and does not promise a particular result.
Follow the signup and PDF-delivery steps
This narrated walkthrough uses platform screenshots and a short editor demonstration. It shows how to build demo pages, then explains a separate existing PDF-delivery setup. The demo pages themselves do not send email.
Download video · Download captions
Video chapters
- 0:00 — Create a signup funnel and deliver a PDF
- 0:17 — 1. Open Sales funnels
- 0:32 — 2. Create the funnel
- 0:54 — 3. Find the funnel steps
- 1:11 — 4. Write the thank-you page
- 1:34 — 5. Write the opt-in page
- 1:56 — 6. Set the field type
- 2:12 — 7. Set the button action
- 2:29 — 8. Grouped Form alternative
- 2:53 — 9. Check desktop and mobile
- 3:16 — 10. Get the public signup link
- 3:35 — 11. Test the page sequence
- 3:57 — 12. Plan PDF delivery
- 4:16 — 13. Optional form for an external site
- 4:40 — 14. Add one delivery email
- 5:13 — 15. Connect the delivery rule
- 5:39 — 16. Verify sender and consent
- 6:02 — 17. Test the whole journey
- 6:29 — 18. Troubleshoot one step at a time
Recorded interface examples: October 2026. Your account labels and available features may differ. Connect and test your own delivery settings before promising visitors an email.
What you’re building
- 1Opt-in pageOne clear reason to sign up, an email field, and a submit button.
- 2Thank-you pageA clear confirmation shown after a successful signup.
- 3Connected stepsThe form saves a contact and sends the visitor to the next step.
Keep the first funnel small
This example uses two pages: an opt-in page followed by a thank-you page. It is a practice setup for learning the editor, not a complete marketing campaign. You can read every step here without submitting an email.
Have a short description of what the visitor will receive, a page title, and confirmation copy ready. If you use the optional PDF request below, that separate form is only for sending the requested checklist; it is not a newsletter signup.
Create the two-step funnel
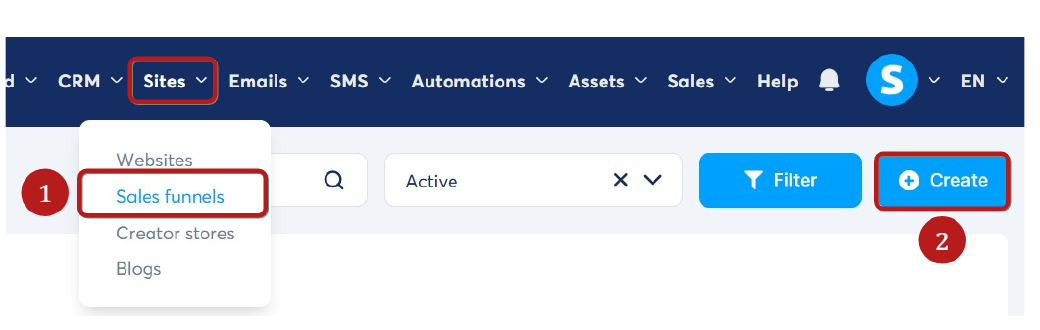
- From the Systeme.io dashboard, open Sites → Sales funnels, then choose Create.
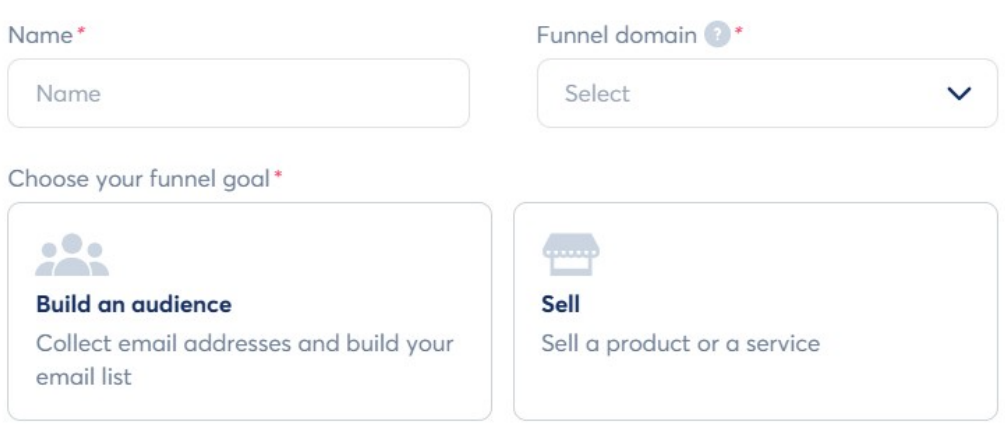
- Give the funnel a name you’ll recognise, such as BB - signup practice.
- Choose your existing Systeme.io domain, set the goal to Build an audience, and select the currency you normally use.
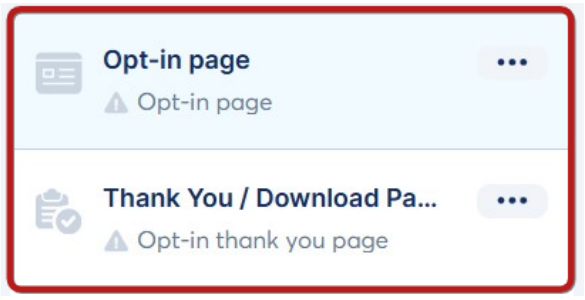
- Save. The new funnel opens with a list of steps. You’ll add or edit the opt-in and thank-you pages there.
Set up the thank-you page
After saving the new funnel, return to Sites → Sales funnels, open the funnel you just created, and select Thank You / Download Page. Choose a simple template if prompted, then select Edit page.
Use a confirmation that matches this practice exercise:
Your test signup worked
Thanks for trying this practice page. No newsletter or download is being sent. You can close this tab now.
Remove leftover sales, download, or newsletter promises from the template unless they accurately describe what the visitor will receive. Save the page and exit the editor.
Build the opt-in page
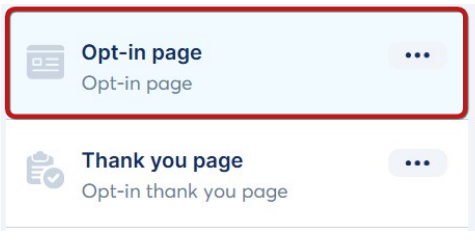
In the funnel step list, select the opt-in page. Choose a simple layout with one email field and one button, then edit the page. This exercise tests saving a contact; it does not send a newsletter or download.
Try this text for your practice page:
Try my first signup page
This is a private practice page. Enter your own email to test that the form saves a contact. No marketing emails will be sent by this exercise.
Button: Test my signup
For a real funnel, replace the practice text only after you have a real delivery and follow-up plan. Remove template text about unrelated offers, downloads, or newsletters. Keep the footer and privacy information easy to find.
Connect the email field and button
The editor may expose the email field and button as separate elements, or as one grouped form. Follow the route that matches what appears when you click the form. Don’t add a second form.
If the email field and button are separate
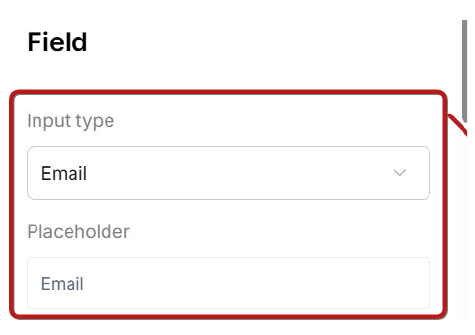
- Click the email field and set Input type to Email. The visible placeholder alone does not make it an email field.
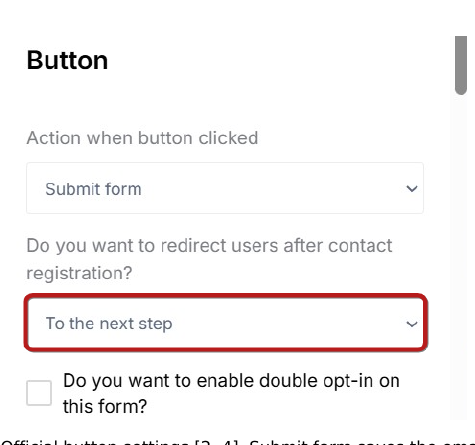
- Click the button. Set Action when button clicked to Submit form.
- Set the redirect choice to To the next step. Keep the thank-you page immediately after the opt-in page in the funnel list.
- Leave email automations unconfigured for this practice exercise. If double opt-in is already enabled, complete its confirmation using an email address you control.
If the form is grouped
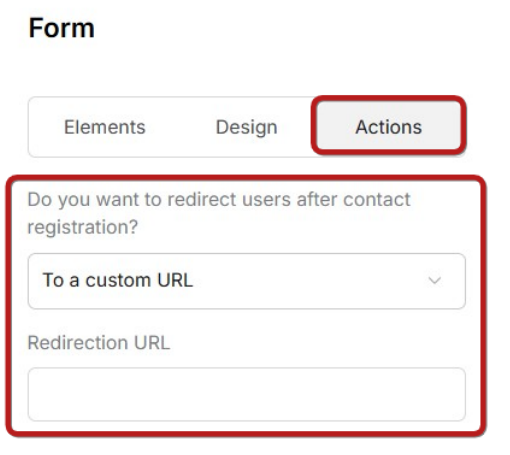
If clicking the whole form opens Elements, Design, and Actions tabs, keep the email field and submit button in that form. Copy the thank-you step’s URL Path, then use Actions → To a custom URL and paste that path into the redirection URL field.
Check the flow on desktop and mobile
- Save your edits in the page editor.
- Use the phone preview to check the text, field, and button at a narrow width. Save again if you make a change, then exit.
- In the funnel list, copy the opt-in page’s public URL Path using its link icon. Use the visitor URL, not the editor URL.
- Check the full route from the public opt-in page through to the thank-you page. If you submit a test, use an email address you control and verify the saved contact in your own account.

Desktop and mobile visibility checklist
Review every section on both device previews. Unless a section is intentionally device-specific, check that it is visible on both:
- Each page section and its main text
- The email field
- The submit button and its label
- Privacy and delivery information near the form
- The thank-you message and any real next step
Confirm that the form remains usable at mobile width and that the button is not hidden below an unexpected blank section. Save and preview both layouts after the final edit.
Troubleshoot the common setup issues
- The button does nothing.
- Check that its action is Submit form and that the email field belongs to the same form.
- The visitor stays on the opt-in page.
- Confirm the redirect choice or, for a grouped form, the custom redirection URL. Check that the thank-you page is next in the funnel.
- The email field accepts the wrong input.
- Reopen the field settings and set Input type to Email.
- A section disappears on mobile.
- Review that section’s device visibility settings, then save and preview again.
- The page still promises an unrelated download.
- Remove leftover template text and make the page copy match the actual delivery.
Systeme.io’s official help centre has current instructions when an editor label or workflow changes.
Get the illustrated checklist by email
The eight-page PDF repeats the setup sequence and includes the mobile visibility checklist. The full article remains available above without signing up.
Use this optional form only if you want the PDF sent to your email. Systeme.io will receive and store the address for delivery. This request is not a marketing subscription. See our privacy information.
If the email form does not load, you can still read the full walkthrough above without signing up.
No newsletter signup is attached to this guide request.
About this walkthrough
This guide follows the same steps as the companion eight-page PDF. Interface details may change. The example funnel is a practice exercise; check your own settings and delivery before inviting real visitors.
For product fit, pricing, and affiliate details, see the Systeme.io overview and our affiliate disclosure.